|
or how to make a dream come true
  In order to succeed in this task you need a certain aptitude for DIY; otherwise I suggest you seek help from a skilful friend willing to give you a hand. In order to succeed in this task you need a certain aptitude for DIY; otherwise I suggest you seek help from a skilful friend willing to give you a hand.
THE TOOLS
  - an electric drill with a set of drill bits; - an electric drill with a set of drill bits;
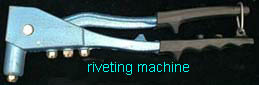
- a riveting machine and suitable aluminium rivets (better if made of copper);
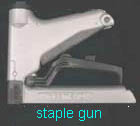
- a staple gun for mounting plastic sheet and mesh; alternatively you can use a hammer and upholstery nails;
- a hand saw for cutting steel;
- a screwdriver set;
- self-tapping screws;
- a plumb-line, a spirit level, a self-made wooden square of 50-cm side.
THE MATERIALS
- steel square hollow section (3 x 3 cm.) to support the structure at the four corners;
- L-shaped aluminium or steel beams (you can either reuse old ones or get them for free as waste material from metal manufacturers), measuring 30 x 30 x 2 mm (thickness) for walls and roof frame;
- steel rectangular hollow section (4 x 2 cm) for the roof ridge;
- 160-cm-long steel track with wheels for the sliding door;
- 6 mm hollow polycarbonate sheets (best if 10 mm but in this case the cost doubles);
- some wood planks for fixing plastic sheet to the roof when insulation is needed;
- a few square metres of thin plastic sheet for lining the roof;
- a few trestles to support the benches;
- 20 cm-high, 50/100 cm-long hollow flat tiles;
- silicone glue and anti-rust paint;
- some plastic net (1 cm mesh roughly) to prevent animals from entering the greenhouse after removing the lateral panels;
- a hail protection net to be positioned 20 centimetres above the roof;
- fittings for the connection to the water, gas and power lines (if needed).
- nuts, bolts and screws.
ESSENTIAL EQUIPMENT
- a heater;
- an oscillating fan;
- an extractor fan;
- a timer to activate the fans;
- a max/min temperature recording thermometer;
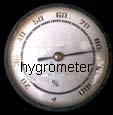
- a hygrometer;
- a rainwater tank;
- some plastic storage boxes for the various kinds of soil.
BUILDING THE GREENHOUSE
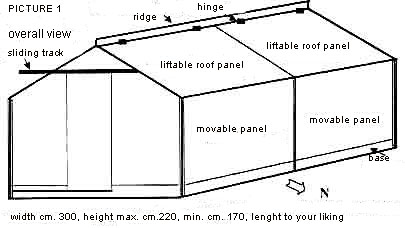
Building regulations. I would like to start by dealing with the most thorny subject (cacti aside!) regarding the building consent. Those who can get it within a reasonable amount of time should ask for it, otherwise there is also the possibility of getting around the problem by not erecting permanent structures. Anyway, it is always best to inquire about local laws and regulations. You might be asked to mount the greenhouse frame on wheels, although this would make things much more complicated. If, however, you own quite a large plot of land in the countryside you should have no problem getting planning permission. One really big mistake is usually building too small a greenhouse. It is true that the bigger the greenhouse, the higher the running costs, but it is also true that the larger volume of air enclosed in a big greenhouse helps to even out temperature fluctuations. Furthermore, as the plants in your collection increase their number you will need more and more room. When orientating the greenhouse choose an east-west position, that is to say that one of the long sides is north-facing and the other south-facing, in order for the plants to get more light during the winter and less in the summer.
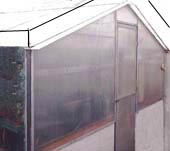
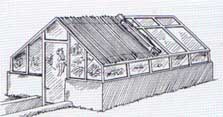
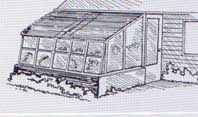
The drawing. The first thing you need to do is to make a drawing, best if it is to scale. Pictures 1 and 2 show one possible way to optimise the space available, which is of the utmost importance in a greenhouse, by reducing the walkways and at the same time limiting wastage of polycarbonate, usually available for sale in two formats: 2 x 3 m. (single sheet) and 2 x 6 m (double sheet). I recommend this material because it is light, not too expensive, easy to work and fix and it is also anti-UV treated, therefore very durable.
  The siting of the greenhouse is very important; it should be situated in an open position far from large trees, both evergreen and deciduous, so as to get the most sunlight. Avoid building the greenhouse in a low-lying spot of your land since water-logged soil would cause humidity levels to rise. It is also best to place the structure not too far from the house so that it can be more easily connected to water, gas, electricity, etc. You can opt for a lean-to glasshouse or conservatory as well, to be erected against a house wall; this way, during the winter, you can exploit the warmth given off by the house and include a radiator run from your existing central heating system, endowed with a thermostatic valve. The siting of the greenhouse is very important; it should be situated in an open position far from large trees, both evergreen and deciduous, so as to get the most sunlight. Avoid building the greenhouse in a low-lying spot of your land since water-logged soil would cause humidity levels to rise. It is also best to place the structure not too far from the house so that it can be more easily connected to water, gas, electricity, etc. You can opt for a lean-to glasshouse or conservatory as well, to be erected against a house wall; this way, during the winter, you can exploit the warmth given off by the house and include a radiator run from your existing central heating system, endowed with a thermostatic valve.
Assembling the structure can be done in different ways, according to your preference. You can use 4/5-mm copper blind rivets or 4.8-mm normal rivets; alternatively you can weld the pieces together.
Fix the polycarbonate to the frame with self-tapping screws (3.2 mm diameter, 11 mm long, if using a 6 mm-thick sheet). The hole for the rivets can be drilled using a HSS drill bit which should be 2/10th larger than the rivet so 3.4 mm roughly. In order to prevent strong winds from tearing away the polycarbonate it is necessary to apply a stainless steel washer, 15 mm wide with a 5 mm-diameter hole, to the buck-tail of the rivet for a better grip. To ensure stability of the structure, the framework grid should be divided into squares not larger than 100 x 100 cm.
The base, made up of 20 cm-high/ 50 to 100 cm-long hollow flat tiles, will be laid all along the perimeter of the greenhouse, except below the door frame, where its height should not exceed 10 cm.
The lateral wall. In order to ensure the necessary air circulation during the summer months, it is best to mount removable panels on one of the two lateral walls, which can be taken off during April or May and put back again in the autumn. The panels can be fastened to the structure using self-tapping screws. Undesirable animals, however, might get into the greenhouse damaging plants and knocking over pots; for this reason it is advisable to fix a plastic net (1-cm-mesh size roughly) permanently on the interior side of the wall.
The roof must be solid and strong enough to bear the weight of snow. It has to be built in such a manner that it can be lifted up to 50 centimetres on both the right and the left side. This can be easily achieved by fastening the roof frame to the ridge with a few hinges. The liftable roof and removable lateral walls allow air to circulate thus preventing temperatures from getting so high in the summertime that we are forced to move the plants outside.
The compartments. The greenhouse, if desired, can be divided into two or three compartments each separated by sliding doors or, more simply, polythene sheets so as to create zones with different temperatures. For example, 10-12°C (50-54°F) for the most delicate succulents; 4-6°C (39-43°F) for the majority of cacti; 0-3°C (32-37°F) for hardier species. Obviously, the heater will be placed where the highest temperature is required whereas the lower temperatures of the other compartments can be regulated by opportunely opening and closing the plastic partitions.
The front door measures 180 x 75 cm and will be mounted on a sliding track, easily available at hardware stores. Leave a 10 cm gap between the door and the floor.
The floor needs to be perfectly level and can be finished off by spreading a 5-cm-layer of gravel. There are also more elegant solutions like concrete or paving slabs.
 Humidity. Succulent plants resent stagnant moisture, especially during the winter when humidity levels may naturally rise up to 100% and fungal diseases are more likely to spread. Furthermore, any fuel-burning heater creates water vapour as by-product which will eventually condense on the roof and drip onto the plants with harmful effects. This can be avoided by lining the roof with a thin plastic sheet separated by a 5-cm-gap. Make sure that the roof is perfectly watertight before fixing the plastic sheet. Otherwise, you can solve the problem using silicone sealant of the type suitable for polycarbonate and metals. The plastic sheet can be stapled with a gun to some wood planks which in turn are fixed to the structure using self-tapping screws. Instead of the staples you can also use upholstery nails or tough drawing pins. Humidity. Succulent plants resent stagnant moisture, especially during the winter when humidity levels may naturally rise up to 100% and fungal diseases are more likely to spread. Furthermore, any fuel-burning heater creates water vapour as by-product which will eventually condense on the roof and drip onto the plants with harmful effects. This can be avoided by lining the roof with a thin plastic sheet separated by a 5-cm-gap. Make sure that the roof is perfectly watertight before fixing the plastic sheet. Otherwise, you can solve the problem using silicone sealant of the type suitable for polycarbonate and metals. The plastic sheet can be stapled with a gun to some wood planks which in turn are fixed to the structure using self-tapping screws. Instead of the staples you can also use upholstery nails or tough drawing pins.
 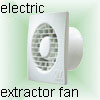 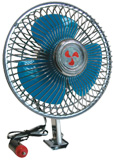  Ventilation throughout the summer is achieved by removing the lateral panels and lifting the roof by 50 to 70 centimetres. During the winter we can activate the obscillating or ceiling fan and the extractor fan, both of them controlled by a timer which, during predetermined periods of time, allows one to provide air circulation and the other to ensure air exchange. Ventilation has an effect on both temperature and humidity. Ventilation throughout the summer is achieved by removing the lateral panels and lifting the roof by 50 to 70 centimetres. During the winter we can activate the obscillating or ceiling fan and the extractor fan, both of them controlled by a timer which, during predetermined periods of time, allows one to provide air circulation and the other to ensure air exchange. Ventilation has an effect on both temperature and humidity.
The benches are held up by means of purpose-built supports, like stacks of bricks, or more simply, by either wood or metal trestles. Place some wood boards or steel beams to support the bench top, a fibre-cement sheet cut to size. A suitable height for the bench is comprised between 50 and 70 centimetres. The room underneath the benches can accommodate your shade-loving plants or the propagator or be used to store soil containers, clean pots, a tank collecting rainwater from the roof, etc.
Shelves can be fixed to the wall with shelf brackets, at approximately 120 cm from the floor. Their width should not exceed 50 cm.
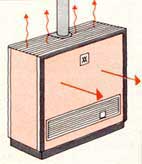 Heating is supplied by means of a kerosene, gas or liquid propane heater endowed with an automatic thermostat designed to operate in a range of temperatures between 5 and 12°C. A better solution are aerotherms; a fan ensures the even distribution of the warm air generated by a hot-water heater throughout the greenhouse. The gases produced by combustion need to be vented out through a tube, perhaps one of those extendible purpose-made aluminium tubes. Electric heating is to be avoided because of the high running costs although it has the advantage of being easily controlled by an ambient thermostat and not increasing air moisture. Heating is supplied by means of a kerosene, gas or liquid propane heater endowed with an automatic thermostat designed to operate in a range of temperatures between 5 and 12°C. A better solution are aerotherms; a fan ensures the even distribution of the warm air generated by a hot-water heater throughout the greenhouse. The gases produced by combustion need to be vented out through a tube, perhaps one of those extendible purpose-made aluminium tubes. Electric heating is to be avoided because of the high running costs although it has the advantage of being easily controlled by an ambient thermostat and not increasing air moisture.
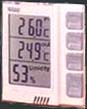 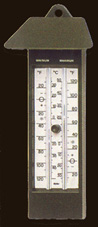 The instrumentation is ideally comprised of a digital weather station capable of recording maximum and minimum temperatures and humidity levels, inside and outside the greenhouse. However, just a traditional hygrometer and a mercury min/max thermometer will serve the purpose. The instrumentation is ideally comprised of a digital weather station capable of recording maximum and minimum temperatures and humidity levels, inside and outside the greenhouse. However, just a traditional hygrometer and a mercury min/max thermometer will serve the purpose.
The lighting equipment normally requires a 40 watt-neon tube. It is advisable to set up a few electric sockets to be used for ventilation, heating, and other appliances like a heated cabinet, etc.
Water is essential, therefore it is recommendable that you put in a washing machine tap with the necessary fitting to connect a hose; this way you will be able to reach every corner of your greenhouse. At one end of the hose you can attach a spray nozzle, adjustable from fine mist to jet.
A hail protection net is useful against hail damage to your polycarbonate panels and has to be fixed above the roof, leaving a gap of about 20 cm in between by means of appropriate supports as shown in the picture on top of the page.
Shading is necessary when the greenhouse is south-facing or located in an open site getting the sun all day; shadow can be provided by a shade cloth laid over the anti-hail net. Shade factor varies depending on knit density, usually ranging from 20 to 50%.
Painting the greenhouse consists in applying two coats of anti-rust paint, so as to ensure protection against the elements for at least two or three years. It is not required for aluminium frameworks.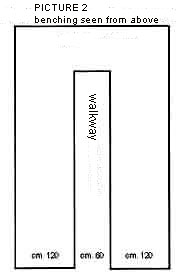
|


")
")
")


