A compendium
with tips, strategies, suggestions based on personal experience
SOIL
The soil consists of weathered rocks, organic matter, water, gases and is the result of chemical, physical and biological processes. It supports the root system and is the place in which reactions and exchanges between solid, liquid and gaseous elements occur and where the plants can find the nutriment they need in the form of inorganic compounds, with the exception of Carbon that is absorbed from the atmosphere. The uptake of nutrients by the roots is possible as long as the minerals are dissolved in the water.
Composition (texture):
- particles of more than 2 mm diameter = stones, pebbles, gravel (soil skeleton);
- from 2 mm to 0.2 mm = coarse sand (improves soil permeability and aeration but makes it more drought-prone)
- from 0,2 mm to 0,02 mm. = fine sand (same effects as coarse sand);
- from 0,02 mm to 0,002 mm = silt (intermediate in size and characteristics between sand and clay)
- less than 0,002 mm. = clay (makes the soil more compacted and impermeable).
The porosity of the soil is expressed as the ratio (also as a percentage) of the total space of the pores between soil particles to the volume of the soil.
The structure is determined by how soil particles are joined together.
Recommending a particular type of soil for succulents is not so simple, not only because in the wild these plants grow in a great variety of soils but also because reproducing certain kinds of substrate can be quite difficult and is not necessarily the best way to grow our plants. When it comes to the best soil mix, any suggestion is personal and is affected by the climatic conditions that each grower encounters, it is consequently debatable and by no means can represent a general view.
As a rule, the soil should have a loose and porous structure that allows air to circulate well and water to drain off freely, though not too quickly, and the amount of organic matter should be moderate. This type of substrate usually contains nutrients in the form of ions that are better held by soil particles and are not easily washed away; they also have a buffering effect on the pH that is kept at a near constant value and is not greatly affected by rainwater or fertilizers. Finally, a balanced population of microorganisms is necessary to improve soil texture and make nutrients more readily available.
Such soils, usually, do not occur naturally at our latitudes so a good substitute might be a mixture of field soil (rich in beneficial microorganisms), sand (low ion absorption capacity and water retention) and leaf mould (for organic matter supply) in various proportions. Other substances may be used instead: garden soil, grit, pumice stone, lapillus, pozzolan ash, etc.
We can lower the soil pH adding some chalk, peat or decayed beech leaves. On the other hand, by incorporating slaked lime, finely crushed marble or oyster shells we help to raise it. The beginners might want to refer to the cultivation notes page where the preparation of the most common potting mixes is explained in more detail.
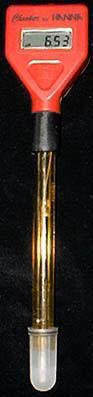
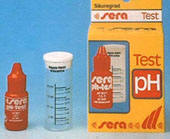
PH. The pH value expresses how acid or alkaline a solution is. Therefore one should not talk of soil acidity or alkalinity of the soil but rather of the solution flowing through it. The measurement range goes from 0 to 14; more precisely a pH of 7 is neutral while values lower or higher than 7 indicate respectively acidity or alkalinity. The ph is measured on a logarithmic scale so that a difference of one unit of pH reflects a ten-fold difference in the hydrogen ion concentration, two units a hundred-fold difference and so on. This means that a soil with a pH of 5 is ten times more acidic than one with a ph of 6, a hundred times as acidic as one with pH 7 and a thousand times as acidic as one with pH 8.
Generally speaking, succulent plants are known to prefer a neutral (ph of 7) or slightly acidic (ph from 6 to 6.5) substrate, with the exception of the epiphytes thriving in more acidic soils and some others that do best in alkaline conditions. Measuring your soil pH, unless you have it tested by a soil testing laboratory, might be troublesome. However, you can do it by yourself using an electronic pH meter (shown in photos above on the right and left) or a pH colour indicator kit (photo below on the left), the latter being less precise but cheaper and accurate enough for most growers (commonly used for testing aquarium or swimming pool water). The pH colour indicator test can be carried out as follows: first mix a teaspoon of soil with 30 cc. of demineralized water in a glass, stirring well, then let the solution rest for a few days; after this filter the mixture using a funnel whose hole has been previously filled with cotton wool and pour 5 cc of the liquid into the measuring cylinder, provided in the kit, and follow the instructions given. This method can also be used for the pH meter test but with larger amounts of water and soil. We do not recommend using pH test papers as they are not very reliable.
Sterilization. It is necessary to sterilize your potting mix especially if the soil contained has already been used or taken from a garden or woodland or if we are sowing delicate seeds. The purpose of this operation is to eliminate undesirable seeds, cryptogamic spores, eggs and larvae of pests, nematodes etc. You can choose one of these simple methods to sterilize soil at home:
- pour boiling water thoroughly over the soil then let it drain;
- bake the soil into an oven set at 100°C (212°F) or slightly above for at least half an hour, or into a microwave for the same amount of time on full power (in this case moisten the soil first);
- dilute formaldehyde (formalin 38/40% aqueous solution) with water in a mix ratio of 1:50 (one part of formaldehyde to 50 parts of water). Do it outdoors to avoid breathing the unhealthy fumes produced. Water the soil with the mixture, applying approximately 10 litres of solution per 30 cc of soil. Stir well and cover the container with plastic. Wait two weeks before planting.
Nutrient deficiency and chlorosis. The yellowish appearance of some plants might be caused by lack of nutrients or by diseases. Sometimes this can also be the symptom of an inadequate soil pH, which can be remedied by simply repotting the plant, or of an insufficient amount of microelements that can be supplied using a suitable fertilizer.
SEEDS AND SEEDLINGS Seed disinfection. This practice proves useful in eliminating fungal spores. One possible method is to immerse the seeds in water maintained at a temperature of 60°C (140°F) for approximately half an hour. Alternatively, you can leave the seeds to soak in a solution of 1 part of sodium hypochlorite (bleach) to ten parts of water for one hour; after that wash them thoroughly with previously boiled rainwater. Another way, possibly the best, is to dust the seeds with a powdered fungicide.
Scarification. Various techniques may help to render seed coats more permeable to water and to accelerate seed germination. The operation is indispensable for hard-coated seeds that are treated differently according to size. Those which can be handled might be scarified with some coarse sand paper or a file or chipped with a needle or another sharp tool. The seeds of the so called "cold-hardy cacti", on the other hand, need to be immersed in sulfuric acid for five minutes then meticulously washed. Stratification. It’s a cold treatment that induces germination, also called vernalisation. It consists in storing the seeds in a refrigerator at a temperature between 1 and 4 °C (34-39°F) for some time thus recreating a sort of artificial winter. Another method is the thermal shock treatment (freezing/thawing); seeds are kept into a freezer overnight then taken out the following day. Checking seed viability. This is a useful method to determine the ability of the seed to germinate. Place some moist cotton (make up remover pads are ideal for this purpose) in a shallow glass or plastic container then scatter a definite number of seeds on top of it as shown on photo; seal with plastic wrap or lid and keep at a temperature suitable for germination. Once the seeds have sprouted you can get important information about germination percentage and time. Pre-germination treatments. It may take quite some time for certain seeds to sprout, especially large ones, and this makes them more susceptible to fungal attacks. Therefore it is advisable to treat them with fungicides before laying them on moist cotton or paper towel, following the same procedure as when you test seeds for viability. Prick out the seedlings as they appear. Minuscule seeds. Sowing minuscule seeds evenly might be a problem. A solution is to mix them with powdered sulfur or charcoal which make the seeds easier to spot and also have anti-fungal properties. Alternatively, you can pour some of the seeds into a piece of paper folded in half then proceed to sow by gently tapping it with your hand; this way you are able to better control the amount of seeds sown. Sowing in jars. Delicate seeds can be sown inside glass jars in a sterile and inert substrate such as pumice, agriperlite, or quartz sand, taking care to remove particles larger than 2 mm (0.8 in) in diameter and the dust-like fraction. Close the lid after sowing and prick out young seedlings as they appear. Pricking out. Young seedlings may be too frail to be pricked out by hand when they need moving to a more suitable substrate. However, a wooden or plastic tag, like those used for plant nomenclature, with a V-shaped portion cut out at one end can assist us in this operation (see picture below).
Collecting seeds. The fruits of your plants must be harvested when fully ripe; the best method for extracting seeds depends on whether they are dehiscent or indehiscent. If the fruits are dehiscent we simply wait for them to open spontaneously. Indehiscent fruits, on the other hand, can be picked up when they are withered or dry or when they detach easily. Fleshy fruits are always indehiscent.
It only takes two weeks for the fruits of some species to ripen (Astrophytum for example). Most succulents mature their fruits within the same year in which they have flowered; others, like Asclepiadaceae family, ripen their follicles the following year. It takes six months to Mesembryanthemums to produce seeds, but these can only be sown one year after pollination has occurred. The minuscule seeds of the Crassulaceae are difficult to germinate.
The fruits can be stored inside a jar placed in a well-ventilated site; do not forget to attach a label with information about the plant genus and species together with the harvest date. If the fruits are fleshy, it’s better to wait for the pulp to become desiccated before storing them. Dry fruits must be laid on a piece of paper and opened. Remove all the impurities with the help of a toothpick and gently blow away the dust-like debris. Tiny seeds might be cleaned using a magnifying lens or a microscope. Fleshy and mucilaginous fruits need to be opened and the sticky pulp with the seeds extracted and placed into a fine sieve; wash thoroughly under running water until the seeds are clean. Leave them to dry then remove the remaining debris.
Follicles should be wrapped in gauze or fine net to avoid the dispersal of the pappus-bearing seeds. The capsules of Euphorbiaceae and Liliaceae also need to be wrapped in gauze before the seeds are ejected through elastic dehiscence. The capsules of Mesembryanthemums must be sheltered from rain and wet if we are to collect seeds from them, otherwise they might have already split open and dispersed their content. My advice is to open the capsules and spread out the seeds on a piece of paper so that you can easily remove and/or blow away the debris. Alternatively, you can immerse the capsules in a glass of water; shake them when fully open and sieve the liquid to collect the seeds.
Seeds must be cleaned thoroughly and the residues of pulp accurately removed as these may be a source of fungal infections. Do not forget to disinfect after harvesting as explained in the above section.
This simple tool (photo on the left) comes in useful when collecting tiny seeds and is very easy to assemble. It consists of a film container and two pieces of aquarium soft pipe each entering through a hole in the lid. Sucking in air through one of the pipes will make the seeds move upwards at the other end and cluster together inside the container.
VEGETATIVE REPRODUCTION Cutting. Under certain conditions many plants can be propagated by rooting a portion of the stem or leaf to obtain genetically identical specimens. This technique is based on the ability of plants to regenerate their organs. At first callus tissue is formed at the site of the wound, then roots are developed and finally shoots arise, showing that the propagation was successful. Reproduction by cuttings is a quick and easy way to obtain new specimens and is particularly profitable when it comes to species that are threatened with extinction or whose seeds are rare. This also allows us to save diseased plants and rejuvenate old or malformed ones. This operation is best carried out from late spring until the end of the summer when plants are in active growth and the sap is fully flowing. In the event of a plant being attacked by rot we can remove a healthy stem portion and store it in a cool place until spring when it will be rooted.
Preparation. Choose a healthy plant and cut the stem then bevel the edge all around the cut surface until the bottom of the stem portion is shaped like an upturned truncated cone; take care not to make the tip too sharp if you want to avoid damaging the central vascular bundles (cactaceae). Flat stem articles, like those of Opuntia, should be cut obliquely. Make sure the tools are sharp, thoroughly cleaned and disinfected with spirit; dust the cut surfaces with sulfur or other fungicide.
- Stem cuttings. After removing the stem portions leave them to dry in a warm place with low humidity. Lay them on a sandy substrate only when the cut surface is completely dry and has already formed an impermeable layer.
As for caulescent succulents, make an horizontal cut 2-3 mm (0.8-1.2 in) below a stem node (if present), remove the lower leaves and cut the upper half of each remaining leaf to reduce water loss. The cutting should be approximately 10 cm (3.9 in). Cuttings taken from Euphorbia must be immersed in hot water to stop latex flow and prevent the formation of a clot which would obstruct the development of the roots.
- Leaf cuttings (whole leaf or portion). Simply cut the leaf with a sharp knife and then leave it to dry before laying it on lightly moistened sandy soil. This method is particularly effective for Sansevieria, Aeonium tabulaeformis, Gasteria, Haworthia and many Crassulaceae like Echeveria, Pachyphytum, Adromiscus, Sedum and Kalanchoe. A peculiar case of asexual propagation is that of Briophyllum that produces miniature plants (propagules) all along the margins of the leaves, some of which may have already developed a root system before touching the ground. Because of this behaviour the plant is quite invasive and it’s probably better to keep it separate from other plants.
As to Lithops (and similar Mesembryanthemums), when taking the portion cut as much stem as possible in order to remove the apical meristem without damaging it. Leave the cutting to dry for a few days then lay it on dry sand.
- Root cuttings. This technique is not often used with succulents; it consists in taking portions of the main roots, approximately 2 cm (0.8 in) long, which will then be planted in light soil and barely covered. Propagate in early March and place the root cuttings in a bottom-heated bed.
Leuchtenbergia principis is a curious case, being one of the few succulents which can be propagated from tubercle cuttings. Substrate. The ideal substrate is composed of sand or pumice stone previously sterilized with boiling water. Planting. Stem cuttings should be lightly pushed into the soil (about 1cm/0.4 in deep) not buried. We can tie them to a support in case they don’t stand upright. Another way is to fill the pot 1/3 full then add a few centimeters of fine grit, place the cutting and pour more grit around to within one centimetre of the rim. Location. The temperature must be warm enough (20-25°C/68-77°F), the air moist and the place bright. Air moisture prevents the cuttings from shriveling although excess humidity may cause rotting. In fact, these three variables need to be balanced and other factors should also be taken into account (for example: the plant we are dealing with, our climate, the season during which we execute the operation). However, experience is essential to achieve good results. To keep humidity levels constant we can place a glass jar upside-down over the cuttings or cover them with a plastic bag.
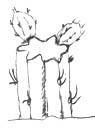
Gradually allow air to circulate once the cuttings appear to have rooted then transplant them in a suitable substrate when the root system is well developed. Using rooting hormones is not usually necessary though it might be helpful with difficult plants like some Euphorbias and Alluaudias. Shoots, division of clumps, rhizomes, tubers. Many plants, such as Aloe, Agave, Echinocereus, Gasteria, Haworthia, Sempervivum, Sansevieria, Sedum, produce a large number of offsets or lateral basal shoots which may have already developed their own roots and can be detached from the mother-plant for propagation. Even if shoots are produced along the stem, therefore having no roots, they can be removed and rooted like cuttings. When a plant does not naturally branch, as is often the case with cacti, we can stimulate the formation of lateral shoots by cutting the stem apex and root them once they have reached the appropriate size.
Runners, stolons. This method of propagation is suitable for those plants with a sprawling habit or sending out long stems that grow horizontally at ground level. It is very simple and consists in burying a portion of the creeping stem to encourage root formation. After the development of a root system the stem can be cut below that point then separated and potted up.
Grafting. With this technique two different plants are fused to become one single organism. The rooted stem being grafted onto is called stock or rootstock, while the plant being inserted is referred to as scion. Grafting is possible only if scion and rootstock are dicots and belong to the same family. Its purposes can be numerous: to accelerate growth of slow-growing specimens which can be later degrafted and re-rooted, to propagate cristate forms, to allow plants lacking in chlorophyll or difficult in cultivation to survive and lastly to save healthy portions of diseased plants or propagate cuttings which cannot be easily rooted. The grafting technique is quite straightforward with plants within Cactaceae, but it can also be performed successfully on Euphorbiaceae, Didieraceae and Asclepiadaceae. It is best to graft plants during the growing period, usually from mid-April to mid August. Take care to remove young portions of the stem whose vascular bundles are not yet lignified. It is also possible to graft seedlings; for more information about this technique visit either ‘seed raising’ or F.A.Q page (question n.22 about hypocotyl grafting) (under translation).
The following plants usually make good rootstocks: Trichocereus schickendatzii, T.spachianus, T.macrogonus, T.pachanoi, T.bridgesii and Opuntia. Echinopsis, with a stem of at least 2-3 cm (0.8-1.2 in) in diameter, is recommended for Aztekium, Ariocarpus, Uebelmannia; Austrocylindropuntia subulata for Tephrocactus. Myrtillocactus is good for Ortegocactus but it should kept at a minimum of 10°C (50°F); Harrisia for Sulcorebutia kept at about 12°C (54°F). Pereskiopsis velutina, P.spathulata, Opuntia humifusa are ideal for seedlings. Use Selenicereus grandiflorus and S.hamatus as rootstocks for all epiphytic cacti. Hylocereus, widely utilized by commercial growers, is not a good choice since it must be kept warm throughout the year and might prove problematic; plants grafted onto Hylocereus should be re-grafted onto a more suitable rootstock.
As for non-cactaceous succulents: Ceropegia woodii is compatible with Asclepiadaceae; Pachypodium lamerei and Nerium Oleander with Apocynaceae; Stapelia is good for Hoodia, Trichocaulon and Tavaresia; Euphorbia mammillaris, E.canariensis, E. ingens for Euphorbias in general; Alluaudia procera for Didieraceae; Crassula portulacacea for Crassulaceae.
As to the way the operation should be executed, the flat graft is the most widespread technique. Make a straight cut across the stock with a sharp knife or cutter previously sterilized with alcohol; avoid using blunt tools or moving the blade back and forth as this will result in an uneven cut surface. Quickly bevel the edges of both the scion and the stock before the cut surfaces start to dry out. To avoid this, Mr. Giuseppe Lodi, a well-known cactus and succulent grower, recommends taking a thin slice (just a few millimetres thick) off the cut surfaces to be left in place until stock and scion are finally joined together. Position the scion on top of the stock, pressing and rubbing the surfaces together in order to get rid of any air bubbles; make sure that the rings of vascular bundles of both scion and stock match. If the diameter of the vascular rings is different, offset the scion on the stock so that the rings cross. The bigger is the area of union between the vascular elements, the greater is the chance of the graft being successful. It is advisable that the diameter of the rootstock be slightly bigger than that of the scion. Bevelling the edges is necessary since the cut surfaces shrink as they dry, while the epidermis doesn’t, and eventually become concave, pushing off the scion. Sometimes the stock produces suckers that finally take over from the graft; to stop this happening remove all the areoles from the rootstock.
To hold the graft in place, pierce through the scion and stock with a couple of robust spines then stretch an elastic band under the pot and over the scion. The pressure applied should be moderate so as not to cause any damage.
Another method is the side graft which basically follows the same rules as the flat graft; by cutting the stems obliquely we increase the area of cut surface and possibly the chance of the vascular bundles making contact (as shown in the picture on the right, last drawing).
Wedge graft: useful with a very small scion; see picture here on the left.
The cleft graft is recommended for Schlumbergera, Aporocactus, Wilcoxia, using Pereskiopsis as rootstock; tie the scion to the stock with raffia (see first two drawings of picture above right).
Degrafting a scion means allowing it to develop its own roots. The removal of the scion is done preferably in the spring; wait for the wound to heal then place the scion on moist soil, best if mineral like pumice, in a warm environment with temperatures between 25 and 30°C (77-86°F) to encourage root growth.
PLANT CONTAINERS Pots. Unless you live in a very mild area where succulents can be planted outdoors, you need to grow them in pots. Whether these should be made of plastic or clay is a long-standing dispute among growers. However, it seems to be generally agreed, now, that plastic is to be preferred since it is lighter, cheaper and easier to sterilize. In addition, plastic, unlike clay, does not allow the soil to dry out too quickly, salt encrustations to form on the surface or roots to adhere to the pot walls. As to the colour, brown is to be preferred, not only because certain shades look like terracotta, but also because black containers, unfortunately quite popular, become hot when exposed to direct sunlight and may scorch the roots. Finally, the shape; square containers are considered to be more convenient as they can be neatly packed together on a bench thus maximizing the use of space (up to 27% is saved).
When potting up plants, we must disinfect containers that have been already used. Immerse the pots in a bucket full of water and remove the debris using a brush. Rinse accurately and sterilize in a solution of 1 part of formaldehyde, lysoform, or bleach to ten parts of water. Leave the pots to soak for at least two days then rinse thoroughly. Clay pots can be soaked in alcohol then set on fire.
Tools. It is good practice to sterilize your tools periodically, following the same procedure as for the disinfection of containers. Sanitize knives, cutters and secateurs using methylated spirit.
Trays. It is recommendable to place small or medium-sized pots on a tray. Not only does this make carrying the plants easier but also allows us to more profitably supply water and fertilizer from below.
Repotting. Plants that need repotting should be moved into a container of suitable size, neither too small as this would compress the roots and make watering and fertilizing more complicated, nor too large since the roots would not spread through the whole potful of soil, growing out horizontally towards the walls instead. Consequently, the plant will soon need a larger container and this will result in an unbalanced appearance and a waste of space. As a rule, the new pot should be two or three centimetres (0.8-1.2 in) larger in diameter than the old one. If a plant has a big taproot, the depth of the pot should be greater than the width while it’s the opposite for plants with fibrous, superficial roots. When potting up seedlings for the first time, use 6-7 cm (2.4-2.8 in) diameter containers; no pot less than 2.5 cm (1 in) in diameter should be used since the soil would dry out too quickly.
Plants sold by supermarket or garden centre chains generally need repotting, even when there is no visible sign of stress, as they are usually grown in peat-based soil which damages the root system in the long run. When moving the plant into a more suitable potting mix, first immerse the container in a bucket full of water until the root-ball is drenched, then lift the plant out of the pot and rinse the roots under running water to remove any residue of peat. Leave to dry in a shady place for a few days then pot up using proper soil.
Succulents are best repotted in the spring though this operation might as well be done any time, except maybe in the autumn when plants are preparing for winter dormancy. Repotting need not be done every year but is necessary whenever we notice that the pot is too small for the plant to thrive, the roots are growing out the drainage holes at the bottom or if growth is poor and the plant looks unhealthy.
To make repotting of large specimens easier, in addition to wearing thick gloves, you can hold the plant with a strip of folded newspaper; turn the pot upside down and strike its rim on the edge of a bench or wood board. Examine the root ball, cutting apart entangled roots and removing those that are dead or too long; treat with insecticide in case you notice the presence of root parasites. If the drainage hole is too large you may want to cover it with a piece of broken clay pot; fill it with drainage material (expanded clay, pumice or gravel) to a few centimetres from the bottom, add some fresh soil and while holding the plant in the right position, try to spread the roots apart. Finish filling the container with the new potting mix to about 1-2 cm (0.4-0.8 in) from the rim with the soil level even with the root collar. Wait at least one week before supplying any water or fertilizer to allow the plant to regenerate the wounded tissues and adjust to the new conditions.
WATER
This subject has already been discussed in the sections Cactaceae, Plant growth factors and Cultivation notes therefore this chapter will only deal with the quality of water. My personal recommendation is to use rainwater that we should start collecting 15 minutes after rainfall is initiated so that it is free from impurities, dust or pathogen spores; avoid using water whose ph level is too low (acid rain). Some people use tap water and purify the liquid by boiling it then leaving it to rest for a while although this is only partially effective, not to mention the fact that the operation becomes elaborate and time-consuming when you grow a large number of plants. Another method is to add ossalic acid (usually one spoon per litre of water), or phosphoric acid (1 cc per lt), but also sulphuric or nitric acid to obtain a pH value between 5.5 and 6.5; all these chemical products are easily available on the market. Here are a few parameters:
- water boiled for 10' min. loses 10% of calcium;
- water boiled for 30' min loses 50% of calcium;
- 10% of the calcium content is lost if water is left to rest for a week;
- Adding 1.2 ml of sulphuric acid, 98% solution, to one litre of water lowers its hardness by one degree DH. So, assuming your tap water contains 150 mg of calcium oxide (Ca O) per litre, its hardness value therefore being 15 degrees on a DH scale, you need 18 ml of sulphuric acid to neutralize all the calcium present in one litre of water.
Another viable solution is using rainwater collected from the roof; we might mix it with tap water to correct acidity, in case the pH should be too low. You can test rainwater acidity with a pH measuring kit, widely used in the aquarium hobby and for water-softening treatments.
An important factor that has to be taken into account is the salinity, measured as electrical conductivity, of the nutritive solution supplied to our plants; its value should be kept between 1.6 and 2.5 mS/cm (microSiemens per centimetre).
It is best to prepare the solution just before applying it as the calcium contained in the water is likely to come into contact and react with phosphorus to form insoluble salts which cannot be assimilated by plants. However, the acidification of the solution can obviate the problem.
FERTILIZERS
A fertilizer is defined as a substance that enriches the soil providing essential nutrients. They are often divided into ‘organic’ or ‘inorganic’ depending on whether they are of natural origin or they have been synthesised. They are available in different forms (liquid, granular, tablets, pills, etc.) and the concentration of nutrients may vary. Good garden soils contain essential macronutrients such as nitrogen, phosphorus, potassium, calcium, sulphur, magnesium and iron which are as important for plant growth as oxygen and carbon, taken up from the atmosphere as carbon dioxide, and hydrogen, extracted from water.
Nitrogen regulates plant growth and is essential for the synthesis of proteins and the process of cellular division; it is transported through the phloem and xylem tissues. The major source of nitrogen is organic matter and humus. It is also fundamental to the formation of plant tissues together with hydrogen and oxygen taken from water and photosynthetic carbon. Special microorganisms are able to convert organic nitrogen into ammonium and then nitrate which is the most readily available form of nitrogen for plant uptake (80-90% of total N). No green plant can fix nitrogen by itself without forming a symbiotic association with specific bacteria or other organisms like Frankia (a fungus). Ammonium nitrate, ammonium sulphate and urea are the major chemical sources of nitrogen, all three creating an acid reaction in the soil, whereas dry blood, hoof and horn meal (the first readily available, the latter slowly released) are alternative organic sources. Succulents, given their unique nature of highly specialised plants, require little nitrogen to thrive; a high concentration of this element, in fact, is harmful and makes the plant more prone to diseases.
Phosphorus is an essential component of nucleic acids (DNA-RNA), and of adenosine triphosphate (ATP); it is also present in chromosomes and many organic compounds that play an important role in the energetic processes; it becomes bound to organic matter and colloids and its absorption can be directly controlled by the plant; it stimulates the development of apical and root meristems, it contributes to healthy growth, makes plants more resistant to diseases and adverse conditions, promotes blooming and seed formation and helps to produce sugars during photosynthesis which are carried in the phloem sap from the leaf to the growing or storage organs. Since soil phosphate is not very soluble, this important element is usually found in low concentrations but it can be supplied as perphosphate which dissolves completely in the water though is not washed away as easily as ammonium nitrate. Among organic fertilizers, bone meal and guano are the richest in phosphorus.
Potassium is present in the cytoplasm and the vacuoles, plays an important role in turgor regulation of cells and determines their osmotic pressure, strengthens the plant tissues through the production of sugars and starch, promotes brighter and more colourful flowers, and affects leaf transpiration. Potassium deficiency generally results in stunted plants with leaves having a withered look. Potassium ions are held by clay particles therefore they are not easily leached from the soil. It is usually applied as potassium sulphate, a water-soluble salt, with a high concentration of K2O (50-52%).
Sulphur and calcium are usually present in sufficient amount in most soils, though this may not be true for many commercial potting mixes. The first is a component of sulphurated amino acids and is involved in protein synthesis; the latter is a constituent of cell membranes and pectins, it also activates enzymes, neutralizes organic acids, delays senescence of plant tissues, enhances plant resistance to parasites and diseases, regulates plant water balance, sap circulation and root growth.
Magnesium is found in chlorophyll and helps to transport phosphorus; it is also known to activate certain biochemical reactions and to be involved in the synthesis of starch and sugars. It needs to be supplied as most soils are deficient in this nutrient and this may lead to chlorosis.
Iron is essential to chloroplasts development and chlorophyll synthesis, has a key role in photosynthesis and cell respiration and is involved in the production of various enzymes. It is usually applied in the chelated form (EDTA, DTPA, EDDHA). The noticeable deficiency symptom, iron chlorosis, causes the leaves to turn yellow.
Some micronutrients are also important as catalysts in many reactions, though they are needed in very small quantities (less than 0,01%); here are the most important:
-boron helps in the transport of sugars and the development of meristem;
-manganese promotes photosynthesis and is an enzyme activator;
-copper has a specific role in the activation of enzymes and the synthesis of proteins;
-zinc is another enzyme activator ad synthesises proteins and hormones;
-molyibdenum is involved in nitrogen metabolism;
-chlorine has a key role in photosynthesis.
A number of other elements are required by some plants, such as silicon, alluminium, cobalt, nickel, selenium, vanadium; these are normally found dissolved in soil water so plants are unlikely to suffer from deficiencies in such chemical substances.
Micronutrients operate mainly as co-factors in many enzymatic activity of cells and may be absorbed not only from the soil solution but also through the leaves.
However, the uptake of the nutritive solution is carried out primarily by the roots, either by osmosis or active transport. Carbon dioxide enter the plant through the leaves and so do sprayed nutrients and, to a much lesser extent, also water.
Fertilizing must be avoided during dormancy or soon after transplanting. The concentration of soluble salts should be less than 2 parts per mil, though it is best to feed more frequently at about 0.5 per mil concentration. The ratio, expressed by three numbers separated by dashes, is the relation between the amounts of the major nutrients, nitrogen, phosphorus and potassium. A succulent specific fertilizer is usually labelled as 1-2-4 or 1-3-5, meaning that it contains little nitrogen but is rich in phosphorus and particularly in potassium.
As to the best method of feeding, we can apply the fertilizer while watering plants or mix it in the soil when potting them up, depending on which plant we are dealing with. A good formula is obtained mixing 1 gr of di ammonium sulphate, 11 gr of di perphosphate, 6 gr of potassium sulphate and 2 gr of magnesium sulphate; alternatively we can dissolve potassium nitrate and monopotassium phosphate, in equal proportions, with a ratio of 0.5 gr per litre of water. However, it is much more convenient to dilute concentrated liquid fertilizers when needed as these are available on the market and also contain micronutrients. As to the quantity of fertilizer to be added to the potting mix, this is is generally 3 gr per litre of soil.
Slow-growing plants should never be fed since their metabolism enables them to use only a little amount of nutrients; therefore, they do not need more than what is already present in water and soil.
HEATING - HUMIDITY- SHADING - VENTILATION
The above names are linked to ‘the greenhouse’ page where each topic is discussed.
WINTER MINIMUMS
SEASONAL CARE
Spring. Come March, most succulents show the first signs of awakening. A few Mammillarias, some Notocactus as well as some Mesembryanthemums will even have flower buds ready to burst open so many people might have the impulse to start watering. It would be a terrible mistake as this may cause them to rot. The water stored by succulent plants in their organs can, in fact, allow them to bloom without receiving any moisture. Expose desert succulents, while still indoors, to more intense sunlight gradually so as to avoid the risk of sunburn which harms the plants and leaves unsightly scars that last for a long time. Cacti that are native to forests enjoy a bright location as long as they do not receive direct light.
Resume watering at the beginning of April, starting with those plants showing water stress symptoms; apply water sparingly and preferably in the morning, taking care that the room temperature is at least 15°C (59°F).
March and April are the best time for transplanting succulents, for thinning out seedlings sown the previous year and lastly for replacing old spent soil with new potting mix, possibly improved with some phosphorus and potassium fertilizer or bone meal. While repotting, examine the root-ball for pests like mealy bug or spider mite.In April, it is possible to start applying liquid fertilizer and sowing in an unheated glasshouse or propagator. Grafting is best done in May, when we can also move our plants outdoors so that they will enjoy full sun exposure and good ventilation.
Summer. Most plants have their peak growth so they need to be watered whenever the soil becomes dry (this might occur quite often), preferably in the evening. It is advisable to provide shelter against hail, heavy rain or strong winds that might damage the plants using a shade or anti-hail net. Keep on applying fertilizer at times while watering. Grafting can be done until the end of August. During the hottest part of summer some plants may enter a kind of dormancy and temporarily cease growing, therefore you should only spray with water during the evening hours.
Autumn. In early September plants reduce their activities in preparation for the winter rest so we have to stop feeding them and give water more sparingly, while still keeping them in full sun. The same applies to Mesembryanthemums, though many of them are soon going to bloom. Plants that have been moved outdoors must be sheltered from rain and brought back indoors by the end of the month; make sure not to bring in any infected plants or pests, like slugs hiding under pots. In October, water only once every 15 days and stop by mid-November. I advise growers that overwinter succulents inside a greenhouse to apply a good powdered fungicide mixed with insecticide using a bellows duster. Wear appropriate protective clothing, gloves and mask and take a shower immediately after that. Specimens that grow during the autumn and winter are best sown at this time of the year.
Winter. As temperatures drop and waterings are suspended (also in very mild areas) the soil slowly becomes dry and plants enter dormancy. It’s time to set up a heating system capable of maintaining a minimum of 4-6°C (39-43°F) which is sufficient for most cacti (Melocactus, Discocactus, Uebelmannia and a few other genera require slightly higher temperatures, though). Tropical succulents like many Euphorbias and caudiciforms need minimum temperatures around 14-16°C (57-61°F) as explained in the section winter minimums. Installing a fan in the glasshouse helps to reduce the problems caused by humid and stagnant air. If you own a glasshouse and want to find out more about the subject, go to the greenhouse page. Succulent growers who haven’t got a greenhouse should move their plants indoors to an unheated place, like a garage, an attic, a stairwell, an indoor balcony or even a sufficiently lit basement. You can cover the plants with sheets of newspaper or fleece in case temperatures become too low. It is best to place succulents in a bright room, although dormant plants do not suffer greatly from lack of light.
Many people keep their cacti inside the house, in a heated room with temperatures hovering around 20-23°C (68-73°F) and poor light, and have to water them or else they would shrivel. As a result, plants will grow thin and yellowish (etiolation) and will be permanently disfigured, will not flower and without a period of rest they will become weak and prematurely die.
Some growers prefer to germinate seeds from December to February thus bringing forward the time of sowing. Obviously they need heating and artificial light to do so as well as a propagator, a device described within the section sowing. When using this method soil sterilization is very important as well as keeping the air moist using the plastic bag method or covering with plastic wrap.
PLANT CARE CALENDAR
BASIC RULES
- A south-facing location promotes healthy and balanced plant growth, profuse flowering and the formation of more robust spines.
- Water only when the soil is completely dry and never during plant dormancy; do not water when in boubt as succulents are more likely to die from excess than lack of moisture.
- A period of rest is essential for the development of strong new growth and the formation of flower buds.
BIZARRE FORMS
Some unusual forms of succulents may occur in cultivation and occasionally in the wild. Such oddities can be divided into four groups: cristate, dichotomous, monstrose and spiral forms.
Cristate forms, also called fasciated, are simply anomalous, not diseased, plants; their vegetative apex does not develop vertically but spreads laterally instead so that the plant becomes crest or fan-shaped and eventually produces curious waves and folds. Dichotomy consists in the division of the apical meristem in two parts from which equal branches arise; this will result in the plant developing two heads. When the plant has multiple heads is referred to as monstrose.
There is a large number of cactaceae developing apical anomalies: Myrtillocactus geometrizans, Lophocereus schottii, Cereus peruvianus, Monvillea spegazzinii, Mammillaria bocasana, M.spinosissima, M.zeilmanniana, M.parkinsonnii, M.nejapensis, Trichocereus bridgesii, Cereus forbesii, Stenocereus marginatus, Sulcorebutia rauschii, to mention a few. Among other succulents: Euphorbia echinus, E.pugniformis, E.piscidermis, E.obesa, E.lanaganii, Aeonium tabulaeformis, Alluaudia procera, Echeveria sangusta.
The reason for such anomalies is still unknown, although some claim they stem from fungal attacks, wounds or excess vigour. Anyway, all attempts to induce them artificially have failed. These forms are propagated by cuttings or grafting, rarely from seed since fasciation does not allow flowering and even when plants do set seed, the seedlings are likely to be normal forms. There are a few exceptions, though, like Cereus peruvianus monstruosus and Gymnocalicium quehlianum producing true seeds that develop into oddities. Cristate Gymnocalycium needs to be cross-pollinated with a normal specimen.
Spiral forms are quite rare and are usually found among columnar cacti and succulents. Due to certain alterations to the apical meristem, possibly genetic mutations, plant outer tissues start to grow at a faster rate than inner ones thus creating a structure with oblique planes and spiralling ribs. Some forms of Astrophytum myriostigma, Copiapoa cinerea and Euphorbia groenwaldii are typical of these plants.
Variegated plants have patches of leaves and/or stem or even the entire aerial part lacking in chlorophyll, thus appearing yellow and sometimes red. A typical variegated form is Gymnocalicium mihanovicii, completely lacking in chlorophyll, that needs to be grafted to survive. A partial variegation is commonly seen in Ferocactus wislizenii. A great number of variegated plants are produced in Japan by exposing plants to electromagnetic radiation.
Chimeras constitute a singular case; they are generated by the fusion of tissues from two different species and the result is totally unpredictable. Echinopsis jaku-jo is thought to be one of them.
Genetic mutations. Another mutation, called sport, occurs when a plant produces an offset with unusual characteristics for the species; if these qualities are desirable the offset will then be propagated. The grower is now in possession of a new cultivar that might be registered and commercialized.
STARTING A COLLECTION
Amateur growers usually become real succulent enthusiasts quite unconsciously, possibly beginning their collection with just few appealing plants bought at the supermarket or florist’s just round the corner. Very likely, they will make more purchases ending up with some twenty nice little pots before long, at which point they have already been infected by "virus collectionis" (the collector’s virus) and are doomed to become ‘cactophiles’. Once entered this phase, they will read whatever book or magazine has got something to do with succulents, look for like-minded people living nearby and maybe join an association. They will soon plunge into a frenzied search on the internet and find new websites, read newsgroup threads and possibly subscribe to a mailing list: a whole new world unfolds before their eyes. They would want to own all of those beautifully flowered plants and at this stage some advice may come in useful.
Everybody has their own likings and we must respect that, but if you want to succeed in growing succulents, bear in mind that you should be able to meet their needs and ensure optimal living conditions. People who have a balcony can grow a number of plants proportional to the available space, though they will have to provide winter protection bringing them into an unheated room, unless they choose such plants as Sempervivum, Sedum, Opuntia, Chamaecereus that may be left outdoors if protected from winter wet. Those who own a patio have a much wider choice, especially if they can set up some kind of shelter, like a portable greenhouse, against harsh weather conditions, possibly installing a heating system to maintain minimum temperatures a few degrees above freezing (4-6°C/39-43°F). As for the greenhouse owners, they have an almost unlimited choice of plants to grow.
With regard to the subject, I would like to point out that it is advisable to restrict our selection to plants with similar needs, possibly within one or a few succulent families, or even genera. Another criterion could be growing plants from different genera which are native to regions with a similar climate. The choice should not only depend on our taste but also on the environmental conditions in which the plants will be living in. A north-facing location is suitable for Haworthia, Gasteria, many Crassulas and epiphytic cacti. On the other hand, a south-facing site greatly widens the choice of plants: almost the entire family of cactaceae and a great variety of succulents, including the nice Lithops. During the warm months they might need to be protected from the strong sunlight by a shading net. I advise the inexperienced grower to begin with the easiest genera, such as Aporocactus, Echinopsis, Ferocactus, Notocactus, Turbinicarpus, Astrophytum, Lobivia, Echinocereus, many Mammillarias and, for those who like columnar cacti, Cereus, Cephalocereus, Cleistocactus, Espostoa. Among non-cactaceous plants I recommend Echeveria, some Euphorbias, Mesembryanthemums, Kalanchoe, Nolina, Senecio, Tacitus.
Once brought home, the newly purchased plants need to be repotted and the root ball examined to check the health of the plant and treat any parasite you may find; remove as much soil as possible around the roots and replace it with some proper potting mix, as explained in the above section about repotting.
NOMENCLATURE
Aristotle (384/322 B.C.) was the first who made an attempt to sort out the intricate matter of the classification of living things, using simple yet precise categorizations. The system of classification is hierarchical, its structure being constituted by levels within other levels, and is based on evolutionary hypotheses (whose foundations were laid down by Darwin); when it comes to succulents we are talking about recently formulated theories that, in the light of advances in botanical knowledge, need further development and therefore may often lead to considerable taxonomic confusion and misidentification of plants. The current Latin binomial system of nomenclature was first formalised by the Swedish naturalist Carl von Linné (Linnaeus in the Latinized form; 1707-1778). The criteria on which modern classification is based are: anatomy, developmental stages, biochemical affinities (revealed by comparison of amino acid sequence of proteins codified by DNA).
The largest and most significant division in the Plant Kingdom, on which we are now focusing attention, is that of Spermatophytes (also known as Phanerogams) that comprises all plants that set seed. Spermatophytes are divided into two subdivisions: Gymnosperms and Angiosperms, both bearing seeds but only the latter producing flowers. Angiosperms are classified in turn into Dicotyledons (with two cotyledons) and Monocotyledons (with one cotyledon only).
TAXONOMIC RANKS
Families are large entities including plants that share some obvious, sometimes less so, key features and are of great concern to the gardener; their name is formed by adding the suffix -aceae. The suffix –oideae is used for subfamilies.
Tribes are groupings within a family which comprise specimens with some unusual characteristics. The suffix –eae is added to the name (inae for subtribes).
The genus embraces related species held together by some common traits. Its name is a Latin noun written with a capital letter and can be considered as the surname of a plant. Cross-pollination between two species in the same genus creates a hybrid. In some cases infrageneric classification might also be used, namely subgenus, section and subsection, series and subseries.
The species (sp) includes plants sharing all the main characteristics. It’s the name of the plant and is written in Latin but with small letters. It may be an adjective, in which case it agrees in number and gender with the genus, a noun with which there might not be agreement or a person’s name that of course cannot agree. Pollination between two plants of the same species generates offsprings very similar to their parent plants.
The subspecies (ssp or subsp) constitutes a systematic category immediately below the species, the members of which differ in some important characteristics.
The variety: when specimens raised from seed develop small degrees of variations that are worth propagating, they are given a third name preceded by the abbreviation var.
Cultivar: (cv) it is said of a variety obtained exclusively in cultivation from variation within species or through hybridization. The name of the cultivar is written with a capital letter enclosed in single quotation marks and is added to the nothogeneric name. This rank is not recognized by the ICSG (International Cactaceae Systematics Group) official classification.
Form: (f. or fa) specimens that exhibit certain variations may also be named as ‘forms’; it may be abbreviated as ‘fa’ and is followed by a noun or adjective describing the most significant characteristic of the plant. This epithet is not recognized by I.C.S.G. nomenclature.
Hybrids can either occur naturally or be obtained artificially; they may be referred to by quoting the two parent species linked by an "x" as in Haworthia truncata x maughanii or given a hybrid name referring to the species as is the case with Sempervivum x roseum or Echeveria x kirchneriana.
Hybrids between different genera can be given a new name, also called nothogeneric, usually obtained by joining the names of the parent plants as in Pachyveria (Pachyphytum + Echeveria) and Aporophyllum (Aporocactus + Epiphyllum). All botanical names are written in italics.
The Field number is a code made up of letters and numbers and refers to a plant or seeds, identified or collected by authorised competent personnel in a certain locality. This constitutes a sort of certificate of origin and a guarantee that the specimen is an actual species not a hybrid plant. However, this is not always true since careless nurserymen and growers may allow pure species to be pollinated by other plants with a different field number or ,even worse, by plants from other species. These unintentionally obtained hybrids and their seeds should no more be regarded or commercialized as a pure species though unfortunately this might happen.


")
")
")
 PH. The pH value expresses how acid or alkaline a solution is. Therefore one should not talk of soil acidity or alkalinity of the soil but rather of the solution flowing through it. The measurement range goes from 0 to 14; more precisely a pH of 7 is neutral while values lower or higher than 7 indicate respectively acidity or alkalinity. The ph is measured on a logarithmic scale so that a difference of one unit of pH reflects a ten-fold difference in the hydrogen ion concentration, two units a hundred-fold difference and so on. This means that a soil with a pH of 5 is ten times more acidic than one with a ph of 6, a hundred times as acidic as one with pH 7 and a thousand times as acidic as one with pH 8.
 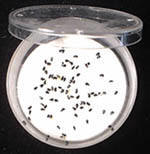 Checking seed viability. This is a useful method to determine the ability of the seed to germinate. Place some moist cotton (make up remover pads are ideal for this purpose) in a shallow glass or plastic container then scatter a definite number of seeds on top of it as shown on photo; seal with plastic wrap or lid and keep at a temperature suitable for germination. Once the seeds have sprouted you can get important information about germination percentage and time.
 Pricking out. Young seedlings may be too frail to be pricked out by hand when they need moving to a more suitable substrate. However, a wooden or plastic tag, like those used for plant nomenclature, with a V-shaped portion cut out at one end can assist us in this operation (see picture below).
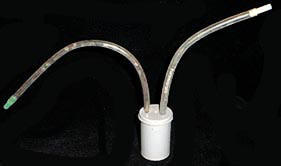
 Shoots, division of clumps, rhizomes, tubers. Many plants, such as Aloe, Agave, Echinocereus, Gasteria, Haworthia, Sempervivum, Sansevieria, Sedum, produce a large number of offsets or lateral basal shoots which may have already developed their own roots and can be detached from the mother-plant for propagation. Even if shoots are produced along the stem, therefore having no roots, they can be removed and rooted like cuttings. When a plant does not naturally branch, as is often the case with cacti, we can stimulate the formation of lateral shoots by cutting the stem apex and root them once they have reached the appropriate size.
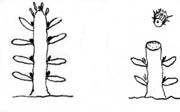 Grafting. With this technique two different plants are fused to become one single organism. The rooted stem being grafted onto is called stock or rootstock, while the plant being inserted is referred to as scion. Grafting is possible only if scion and rootstock are dicots and belong to the same family. Its purposes can be numerous: to accelerate growth of slow-growing specimens which can be later degrafted and re-rooted, to propagate cristate forms, to allow plants lacking in chlorophyll or difficult in cultivation to survive and lastly to save healthy portions of diseased plants or propagate cuttings which cannot be easily rooted. The grafting technique is quite straightforward with plants within Cactaceae, but it can also be performed successfully on Euphorbiaceae, Didieraceae and Asclepiadaceae. It is best to graft plants during the growing period, usually from mid-April to mid August. Take care to remove young portions of the stem whose vascular bundles are not yet lignified. It is also possible to graft seedlings; for more information about this technique visit either ‘seed raising’ or F.A.Q page (question n.22 about hypocotyl grafting) (under translation).
 As to the way the operation should be executed, the flat graft is the most widespread technique. Make a straight cut across the stock with a sharp knife or cutter previously sterilized with alcohol; avoid using blunt tools or moving the blade back and forth as this will result in an uneven cut surface. Quickly bevel the edges of both the scion and the stock before the cut surfaces start to dry out. To avoid this, Mr. Giuseppe Lodi, a well-known cactus and succulent grower, recommends taking a thin slice (just a few millimetres thick) off the cut surfaces to be left in place until stock and scion are finally joined together. Position the scion on top of the stock, pressing and rubbing the surfaces together in order to get rid of any air bubbles; make sure that the rings of vascular bundles of both scion and stock match. If the diameter of the vascular rings is different, offset the scion on the stock so that the rings cross. The bigger is the area of union between t
 he vascular elements, the greater is the chance of the graft being successful. It is advisable that the diameter of the rootstock be slightly bigger than that of the scion. Bevelling the edges is necessary since the cut surfaces shrink as they dry, while the epidermis doesn’t, and eventually become concave, pushing off the scion. Sometimes the stock produces suckers that finally take over from the graft; to stop this happening remove all the areoles from the rootstock.


